Sunday, 29 September 2013

Sports Technology Create Stage

You will start creating the product/ IT solution by following your Plan and taking into consideration the chosen design. The Created product should show
- Thorough competence in the use of IT tools
- Fully justified any modifications to the original design in Journal
- Original and outstanding solution with many IT techniques applied.
- be of the best quality

The process journal should be used throughout the create stage. This should be done at the end of each lesson, or at home or during your free times when working on the product. Ideas in the journal must show:
  • Date of entry
  • What you did
  • a screenshot before and a screenshot after working on that section
  • Changes to the plans and why?
  • What you will do next.

Moderation report comments;
§         The monitoring team felt that despite a lack of creativity in some of the products/solutions, students had worked conscientiously on this stage. 
§         The comparatively strong students included detailed journals, mentioning problems they faced and how they overcame these problems. However, there was a lack of evidence to show what they had achieved during each of their ‘create’ sessions. Screen shots or photographs illustrating the progress being made could have achieved this.
§         Ensure students document the create process with clips and photographs that illustrate their progress at significant stages. 

Assessment Criteria
Levels
Task Specific Descriptor
0

The student does not reach a standard described by any of the descriptors given below.
1-2

The student considers the plan and creates at least part of a product/solution.
3-4

The student uses appropriate techniques and equipment. The student follows the plan and mentions any modifications made, resulting in a product/solution of good quality.


5-6

The student competently uses appropriate techniques and equipment. The student follows the plan and justifies any modifications made, resulting in a product/solution of appropriate quality using the resources available.


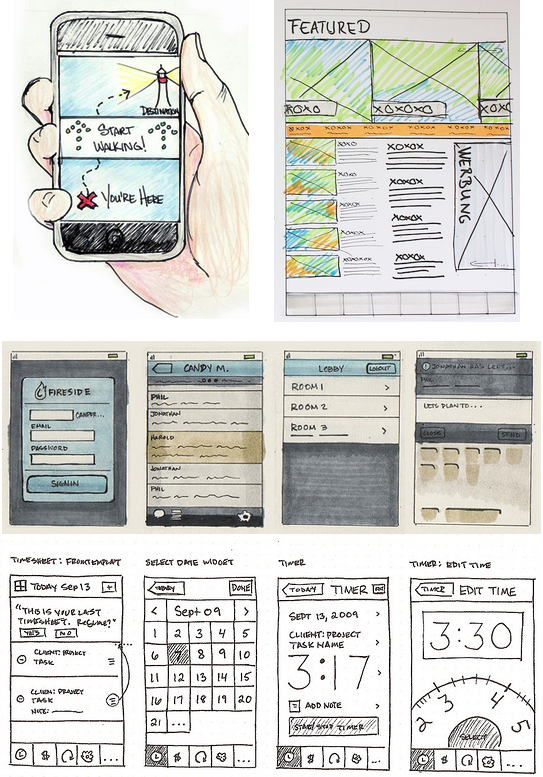
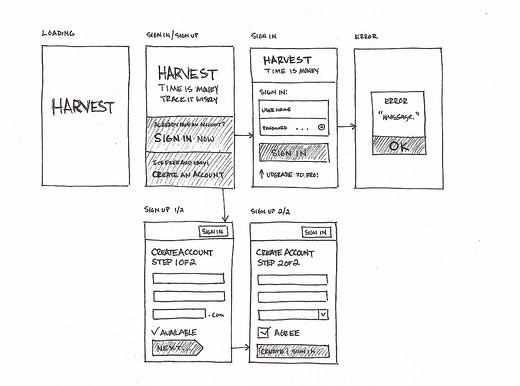
Example of process journal. The example below shows that all the stages design cycle were included. Yours should only show entries for create stage.
https://docs.google.com/file/d/0B8VAiXCgqIIbWVB2YVItR1FNX0U/edit?usp=sharing

Saturday, 21 September 2013

Plan Stage Sport Technology Unit

This stage is after you have finished the designs. The plan for your product will need to have the following items:
1.     Introduction
A simple paragraph, which aimed to explains the duration available for planning, the sections/tools you will use, and state those who will be helpful to you in the stage(s) coming.
2.     Basic Steps;
The basic steps are brief sentences outlining the main steps in the in the plan. The basic steps do not give details about the resources required and durations. Limit the outline of steps to 10.

A Gantt chart can be used after the basic steps. The Gantt can have only one additional pieces of information of when the task will start and end. Example

Gantt Chart
27-29 Sept
30- 2 Oct
3-5 Oct
6-8 Oct
9-10 Oct
11-13 Oct
14-16 Oct
17-19 Oct
20-12 Oct
Step # 1
Preparation (start-up the Game application, Develop the characters for the game


xxxxxxx


Step # 6
Modify the levels of the game.  Sound and the environment for the game modification.


3.       Production plan /Process Plan (plan for the creation part only)
The process plan is detailed information about process of creation. The process plan will use a table to show the step, activity in the step, the date, resources required, remarks and if possible where the task will be done.
The production plan is developed form the steps identified in the basic steps.

Plan for creating a Game
Duration in Mins

Date
Step
Activity capturing the techniques
Resources and for what

Remarks
Where the tasks will done
30


27/9/13
1
Preparation (start-up the Game application, Develop the characters for the game
Game Maker software- to create the characters,

3D game software tutorial – to learn how to develop the frames and render them.
Software crashed while 3D characters.

Used only objects in the game maker.
Lesson
X


X
X
X
Home
90


15/10/13
6
Step # 6
Modify the levels of the game.  Sound and the environment for the game modification

Design drafts,
reference material on
Google Sketch Up usage
Free time

4.      Evaluation of the Plan
Finally you have to Evaluate your plan –The evaluation of the plan looks at how realistic, logical, and achievable is your plan. This involves predicting any problems that may occur in each step and write down any suggestions to how to solve those problems. Evaluation of the plan examines some of the steps to see if the duration or the resources assigned are sufficient and if not what are your suggestions to improve?


The evaluation of the plan is evaluated by focusing on the FIVE main categories:
·  Feasibility of your plan;
·  Effectiveness of your plan;
·  Efficiency of your plan;
·  and Potential problems and possible Solutions groups

·  What modification can be done to the design in the light of the issues arising?

Notes: Feedback on Plan stage from Moderation report
 ·  The plans were essentially well documented and provided a link between the final proposed design and the realization of the final product/solution.
·  Most plans included logical sequential steps and timings.
·   Students should be encouraged not only to list resources but also say how they may be used.
·  The evaluation of the plan is necessary for students to reach the higher-level descriptors. It is required to determine whether the plan is feasible or realistic, could it be followed by others and has undergone any modifications since the design stage. 

Assessment Criteria 
Levels
Task Specific Descriptor

0

The student does not reach a standard described by any of the descriptors given below.

1-2

The student produces a plan that contains some details of the steps and/or the resources required.

3-4

The student produces a plan that contains a number of logical steps that include resources and time. The student makes some attempt to evaluate the plan.

5-6

The student produces a plan that contains a number of detailed, logical steps that describe the use of resources and time. The student critically evaluates the plan and justifies any modifications to the design.

Sample for Plan Stage.


Saturday, 7 September 2013

Design Stage Sports Technology

In the design stage you are expected to:

a)     Generate several feasible and excellent designs that meet the design specifications
b)     Evaluate each design against the design specifications
c)     Then select one design, justify your choice and evaluate this critically against the design specification.

Designs can be sketched by hand and scanned copies submitted. Students can choose to use any software to develop their designs. All design work must be submitted in soft copy.

Examples of shoe designs.

Computer Technology example designs (websites)


   Animations and video storyboards designs


Moderation Feedback from IBO
Note below the feedback extract from the moderation report on Design Stage 
The comparatively good students produced very clear and well-annotated design proposals. However, overall students did not show a wide range of ideas, which is necessary to reach the higher band levels. Again, ideas were mostly pencil drawings and may have been improved by including samples from various sources that could be used as part of their product/solution.
- 3 designs was not considered to be a range of feasible designs
- At the design stage, students are encouraged to develop their initial drawings with clips or screen shots from sources that may visually enhance their ideas/solutions.

Sample1 students work
Design 1
Design 3
Justification

Sample 2 students work
https://docs.google.com/file/d/0B8VAiXCgqIIbdUoxcEJWUDRXNUU/edit?usp=sharing
      Assessment criteria
Levels
Task Specific Descriptor
 0
 The student does not reach a standard described by any of the descriptors given below.
 1-2
 The student generates one design, and makes some attempt to justify this against the design specification.
3-4

The student generates a few designs, justifying the choice of one design and fully evaluating this against the design specification. 
5-6

The student generates a range of feasible designs, each evaluated against the design specification. The student justifies the chosen design and evaluates it fully and critically against the design specification.